








Candles made from local beeswax bring warmth and charm into any space. The sweet, subtle scent and soft glow of candlelight can transform the atmosphere of a room. Making your own candles allows you to customize scents, shapes, and sizes while supporting local beekeepers. This guide will walk you through everything you need to know about creating your own beeswax candles, from selecting materials to perfecting the craft.
- Gather local beeswax from nearby suppliers for a fresh and natural product.
- Select the right wick size to ensure optimal burning and fragrance release.
- Experiment with essential oils for added scent and ambiance.
Table of Contents
Why Choose Local Beeswax?
Using local beeswax has several advantages. First, it supports local beekeepers, helping to sustain their businesses and promote bee populations. Bees play a vital role in pollination, which is crucial for our food supply. By choosing local products, you are participating in a more sustainable economy.
Local beeswax has a rich, natural scent that enhances the candle experience. Unlike paraffin wax, which is derived from petroleum and may have harmful effects, beeswax is a natural product. It burns cleaner and produces less soot, making it a healthier choice for indoor air quality. Additionally, beeswax has a longer burn time compared to other waxes, meaning your candles will last longer.
Local beekeepers often sell their products at farmers’ markets, craft fairs, or online. By purchasing directly from them, you can ask questions about their practices and learn more about the importance of bees in our ecosystem. This connection can also lead to a deeper appreciation for the craft of candle making.
Gathering Your Materials
Before you start making your candles, gather all the necessary materials. Here is a list of what you will need:
- Local beeswax: Purchase from a local beekeeper or farmers’ market. Make sure it is 100% pure beeswax.
- Candle wicks: Choose the right size based on your mold and the diameter of your candle. Cotton or wood wicks work well.
- Essential oils: Select your favorite scents for fragrance. Lavender, eucalyptus, and citrus are popular choices.
- Molds: Use silicone molds, glass jars, or metal tins to shape your candles. Make sure they are clean and dry.
- Double boiler: This will help you melt the beeswax gently without burning it.
- Thermometer: Use this to monitor the wax temperature for optimal pouring.
- Stirring utensil: A wooden stick or spoon works well for blending in the essential oils.
Once you have gathered your materials, you are ready to start the candle-making process. Ensure your workspace is clean and organized to make the entire process smooth and enjoyable.
Preparing Your Workspace
Setting up your workspace is an essential step in making candles. Choose a flat, stable surface away from drafts and direct sunlight. Lay down newspaper or a protective covering to catch any spills. Gather all your materials within reach to avoid interruptions during the process.
Wear an apron or old clothing to protect against potential wax spills. Beeswax can be sticky, and it is easier to clean up if it does not get on your clothes. Have paper towels or rags handy for any quick clean-ups.
Ensure proper ventilation in your workspace. While beeswax burns cleanly, some essential oils can be strong. Open a window or use a fan to keep the air fresh. This will also help with any lingering scents from previous projects.
Melting the Beeswax
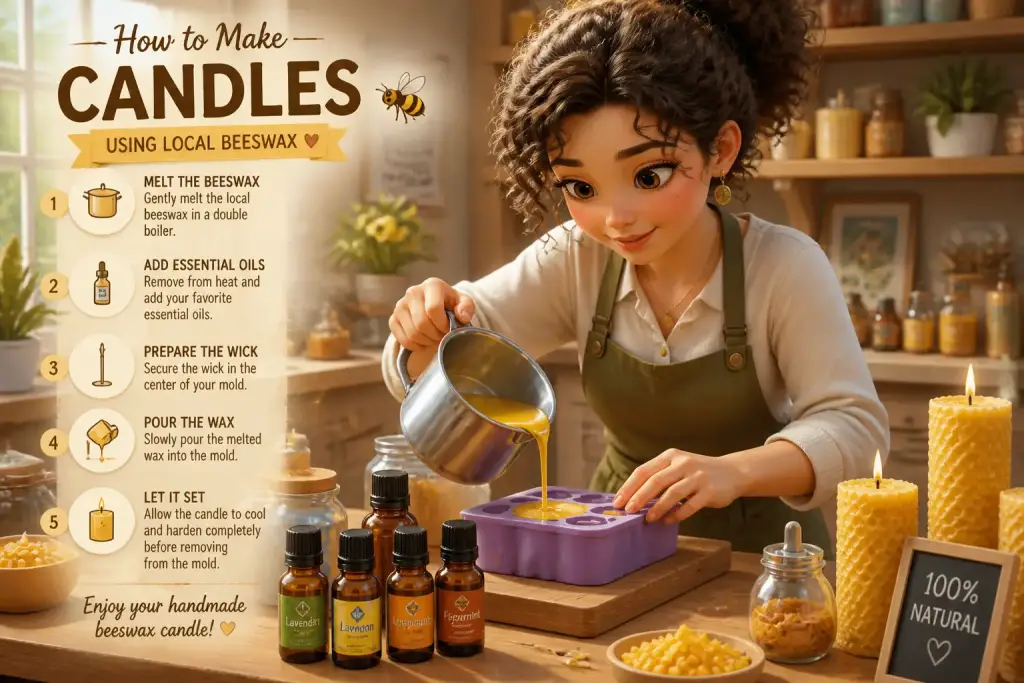
Melting beeswax requires careful attention to temperature. Start by cutting the beeswax into small chunks to help it melt evenly. Place the chunks in the top part of your double boiler. Fill the bottom part with water and heat it gently over medium heat. Stir the beeswax occasionally to help it melt uniformly.
The ideal melting temperature for beeswax is around 145 to 160 degrees Fahrenheit (63 to 71 degrees Celsius). A thermometer will help you monitor the temperature accurately. If the beeswax gets too hot, it can lose its natural properties or change color. Keep a close eye on the melting process to achieve the best results.
As the beeswax melts, you can prepare your molds. If you are using a mold that requires a wick, now is the time to secure the wick in the center. For jars or tins, you can use a small amount of melted wax to adhere the wick to the bottom. This will keep it in place when you pour in the melted wax.
Adding Fragrance and Pouring the Wax
Once the beeswax is completely melted, it’s time to add your chosen essential oils. The ideal amount is around 1 ounce of essential oil per pound of beeswax, but you can adjust according to your scent preference. Stir the essential oils into the melted wax thoroughly to ensure an even distribution of fragrance.
After mixing in the oils, it’s time to pour the wax into your prepared molds. Allow the melted wax to cool slightly before pouring, ideally around 140 degrees Fahrenheit (60 degrees Celsius). This temperature helps prevent the wax from cracking as it cools.
Pour slowly and steadily to avoid creating bubbles. Fill your molds to the desired level, leaving a small space at the top for expansion. If you are making layered candles, allow the first layer to cool and harden before adding additional layers.
Always preheat your molds slightly before pouring in the wax to prevent cracking and ensure a smooth finish.
Cooling and Finishing Touches
Allow your candles to cool completely before removing them from the molds. This can take several hours, depending on the size of your candles. Do not rush this process, as removing them too soon may cause the candles to break or lose their shape.
Once cooled, carefully remove the candles from their molds. Trim the wicks to about 1/4 inch above the surface of the candle. This ensures a clean burn and prevents excessive smoking when lit.
If you want to personalize your candles further, consider adding decorative elements like dried flowers or herbs. You can embed these into the candle while pouring, or attach them to the outside after the candle has cooled.
Enjoying Your Candles and Sharing the Craft
Your homemade beeswax candles are now ready to be enjoyed. Light them in your home to create a cozy atmosphere or give them as thoughtful gifts to friends and family. The natural glow and gentle scent can enhance any setting, making your spaces feel inviting.
Sharing the craft of candle making can be a fun activity with friends or family. Host a candle-making party where everyone can create their own unique candles. This is a great way to bond and enjoy a creative experience together.
Consider donating some of your candles to local charities or community events. Not only does this spread joy, but it also highlights the importance of supporting local artisans and sustainable practices. For more ideas on supporting local businesses, check out our article on supporting local artisans.
Building Consistency With The Joy of Candle Making
Making candles from local beeswax is a rewarding and enjoyable activity. It allows you to explore your creativity while supporting local beekeepers and contributing to a sustainable environment. The process is straightforward and offers endless possibilities for customization.
As you continue to experiment with different scents, molds, and techniques, you will refine your skills and develop a deeper appreciation for the art of candle making. Embrace the joy of crafting and share your creations with the world, fostering a sense of community and connection.